
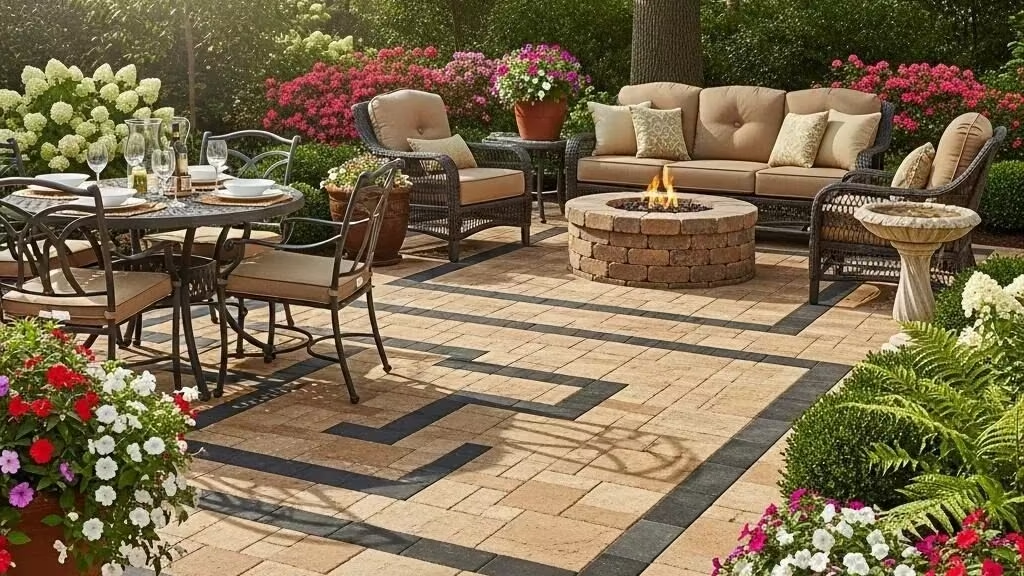
Residential pavers are individual paving units—made from concrete, brick, natural stone, porcelain, or permeable systems—laid to create long-lasting, attractive outdoor surfaces like patios, driveways, walkways, and pool decks. This guide walks through how pavers perform, compares the best materials for common uses, breaks down realistic installation costs, and gives a clear DIY installation checklist plus maintenance and design advice so you can decide whether to do it yourself or hire a pro. Many homeowners get stuck on unclear pricing, material longevity, and which patterns handle vehicle traffic — we clear up those questions with practical cost ranges, material comparisons, and step-by-step installation guidance. You’ll see how material choice affects lifecycle cost and drainage, what to budget for excavation and base work, and which patterns work best in high-traffic spots. Below you’ll find definitions and benefits, transparent cost breakdowns, material comparisons, a hands-on How-To installation section with tools, maintenance tips, and design ideas to help you finish your project with confidence.
What are residential pavers and why pick them for your home?
Residential pavers are modular hardscape units that interlock or fit together to create stable, wearable surfaces. They work by spreading loads over a properly compacted base, and homeowners like them for easy repairs, flexible looks, and better drainage versus single‑pour surfaces. Pavers perform because of a layered system—subgrade, compacted gravel base, bedding sand, the paver units, and joint sand—so correct base depth and compaction are the technical details that deliver long-term performance. For homeowners, that means surfaces you can repair piece-by-piece, match to your home’s style, expand later, and choose permeable options to control runoff. Below is a quick list of typical uses and the main homeowner benefits to help you decide if pavers are right for your property.
Common uses for residential pavers include:
- Patios designed for outdoor living, comfort, and curb appeal.
- Driveways where interlocking pavers spread vehicle loads and resist cracking.
- Walkways and pool surrounds that need slip resistance and reliable drainage.
- Courtyards and basement drain zones where permeability reduces runoff.
Those applications show why homeowners choose pavers and lead naturally to picking the right paver types for each use.
Heavenly Greens installs residential pavers as part of our outdoor-surface services. As a Bay Area specialist, we offer design consultations and project portfolios for homeowners exploring paver options. If you want help with pattern selection, base specs, or a budgeted proposal, we can provide on-site consultations and estimates tailored to San Jose‑area site conditions.
Which types of residential pavers are available?
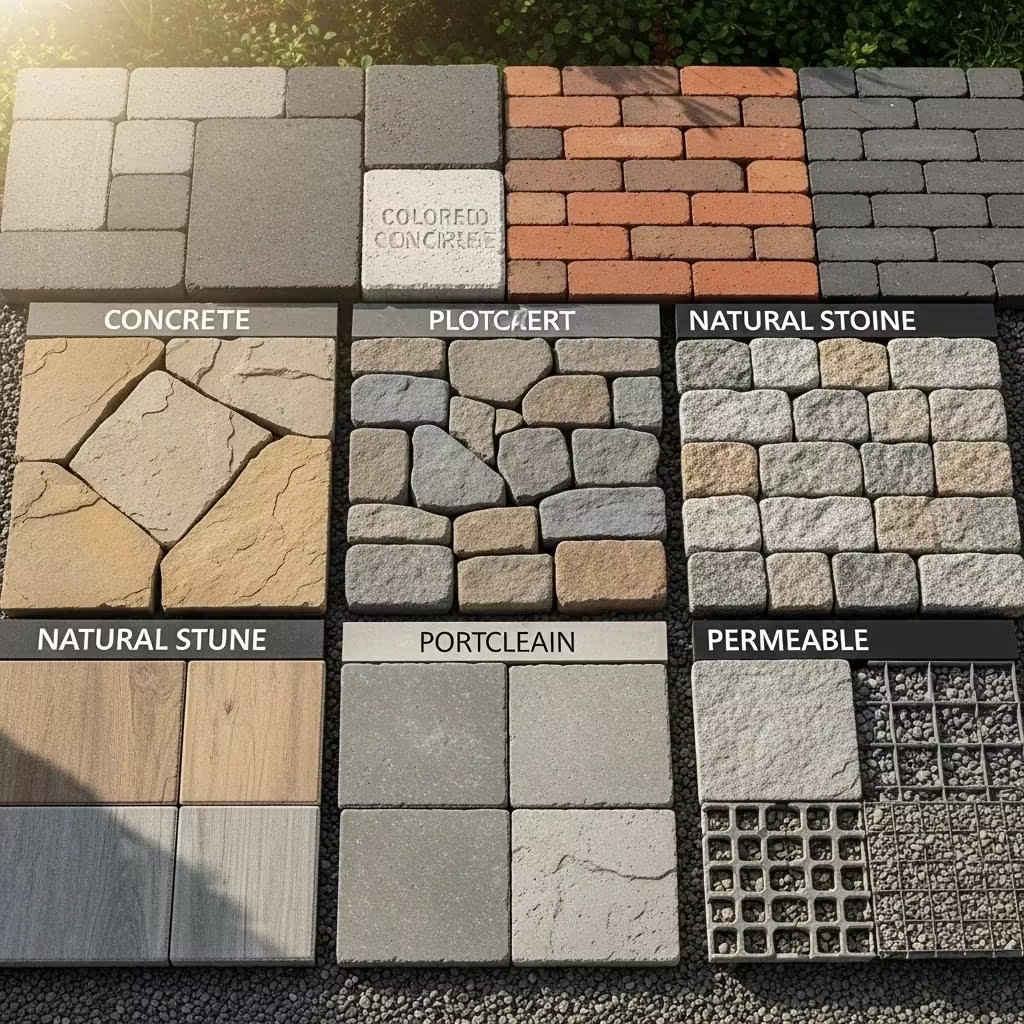
Pavers fall into five main material families—concrete, brick, natural stone, porcelain, and permeable units—each with distinct performance and aesthetic traits. Concrete pavers are versatile and budget-friendly with many shapes and colors. Brick delivers a classic look and strong compressive strength but can need joint maintenance. Natural stone offers unique textures and a premium finish but costs more and varies by quarry. Porcelain gives thin, low-absorption tiles with modern finishes but needs a very precise base. Permeable pavers let water pass through and require specialized bases and joint systems. Choosing among them comes down to budget, the look you want, and drainage needs.
Concrete and brick are common for high-traffic driveways because of their interlock, while natural stone and porcelain shine on patios and terraces where appearance matters most. Understanding these differences sets up the deeper material comparison later in this guide.
What are the benefits of installing residential pavers?
Pavers bring several homeowner advantages thanks to their modular construction, material variety, and layered installation system. Because individual units can be lifted and replaced, spot repairs are easier and less costly than fixing cracked poured concrete. Permeable pavers help manage stormwater and can reduce urban heat island effects when paired with lighter colors or open joints. Pavers also boost curb appeal and resale value through customizable patterns, borders, and mixed materials that match your home’s architecture.
Those benefits feed directly into cost-versus-value decisions and installation planning, which we cover next with clear pricing and the main cost drivers.
How much does residential paver installation cost?
Installed pricing for residential paver projects depends on material selection, access, base preparation, and overall design complexity. Heavenly Greens prefers a Good / Better / Best structure that offers broad, realistic expectations rather than exact numbers. In general, most professionally installed paver systems fall within a wide $12–$20+ per sq ft range, with higher-end materials and deeper base requirements increasing the final cost. Install timelines are typically 1–2 days per 500 sq ft, depending on crew size and access.
| Paver Tier | Material Type | Broad Installed Cost Expectation | Best Use Case |
|---|---|---|---|
| Good | Standard concrete pavers | Typically in the lower end of the $12–$20+ per sq ft range | Driveways, patios, walkways with standard site prep |
| Better | Brick pavers, textured concrete pavers | Mid-range of the installed range; depends on edging and pattern | Decorative patios, mixed-pattern designs, moderate traffic areas |
| Best | Premium porcelain or natural stone | Upper end of the installed range due to material and labor | Luxury outdoor spaces with high aesthetic requirements |
This table makes it clear how material choice shifts installed cost and helps you plan realistic budgets and compare contractor quotes.
Key cost drivers include site access, excavation depth, base material volume, drainage work, pattern complexity (cuts increase labor), edge restraints, and whether sealing or other finishes are requested. Contractors will also assess slope, root intrusion, soil type, and whether an existing surface must be removed to give an accurate price.
- Typical labor and site-prep items: excavation, subgrade correction, geotextile where required, gravel base placement and compaction, bedding sand screeding, paver placement and cutting, jointing sand application, and final compaction and sealing.
When comparing bids, ask for a line-item breakdown showing materials, base depth, and labor hours so you can see where cost adjustments are possible without sacrificing longevity. For Bay Area homeowners, Heavenly Greens offers free estimates and local cost guidance to align budgets with San Jose-area conditions and to explain recommended base depths and drainage solutions.
What are the typical material costs for different paver types?
This section zooms in on material-only pricing and the main factors that affect those prices so you can budget materials separately from labor and site prep. Material cost varies with unit size and thickness, finish (tumbled, sawn, honed), whether stone is imported, and whether specialized permeable units are needed. Thicker units and premium finishes raise costs, while standard interlocking concrete units remain the most economical. Remember lifecycle costs—maintenance, replacement intervals, and sealing—because a lower up-front material price can mean higher long-term expense.
- Factors that influence material price include paver thickness (60–80 mm is common for driveways), finish type, and source logistics for natural stone.
Those material details lead into labor and site-prep costs, which often make up a large portion of the installed price.
What labor and site preparation costs should homeowners expect?
Labor and site prep typically account for 40–60% of total installed cost and vary with local labor rates, site complexity, and equipment needs. Work includes excavation, base aggregate placement, compaction with a plate compactor, screeding bedding sand, precise laying, cutting, and installing edge restraints. Difficult site conditions—steep slopes, large roots, or the need for retaining walls or drainage features—increase labor hours and equipment rental. Proper base preparation is the single most important factor for longevity: an under-built base or poor compaction causes settling and failure, so paying for quality base work reduces lifetime repairs.
- To get reliable bids, request contractors specify base depth, gravel type, compaction method, and any drainage provisions in writing.
Knowing labor and prep costs lets homeowners decide when DIY makes sense (small, simple areas) and when to hire professionals (large driveways, heavy loads, or complex drainage).
Which materials are best for residential pavers?
The best material depends on use—driveway, patio, walkway, or pool deck—plus desired appearance and performance needs like slip resistance or permeability. No single material is best for every job, but clear recommendations emerge from comparing pros, cons, and costs. The table below lines up common materials against practical attributes so you can match material to purpose with lifecycle costs in mind.
| Material Type | Pros | Cons | Best Uses |
|---|---|---|---|
| Concrete Pavers | Cost-effective, many shapes/colors, strong | Can fade, needs joint maintenance | Driveways, patios, walkways |
| Brick Pavers | Classic look, strong compressive strength | Can spall in freeze-thaw zones; limited colors | Traditional driveways, walkways |
| Natural Stone | Distinctive appearance, high perceived value, durable | Higher cost, variable thickness and finish | Patios, terraces, accent areas |
| Porcelain Pavers | Low water absorption, modern finish, stain-resistant | Requires a precise base, higher material cost | Modern patios, rooftops, pool decks |
| Permeable Pavers | Promotes infiltration, reduces runoff | Needs engineered base, joint maintenance | Sustainable driveways, patios, low-impact zones |
How do concrete, brick, natural stone, and porcelain compare?
Concrete pavers are the most versatile and budget-friendly option, with many shapes and color systems that suit most residential projects while balancing cost and strength. Brick offers a timeless aesthetic and excellent compressive strength, making it a strong choice for traditional homes, though it may need more joint maintenance and is less forgiving if the base shifts. Natural stone delivers premium looks and unique textures, but variability in thickness and higher cost usually make it better for patios and feature areas unless engineered for driveways. Porcelain is growing in popularity for low-maintenance, modern designs because of its low absorption and consistent surface, but it demands a precise base to avoid cracking or uneven edges (lippage).
With those characteristics in mind, many homeowners also consider permeable and eco-friendly options for stormwater management and sustainability goals.
What eco-friendly and permeable paver options exist?
Eco-friendly choices focus on water infiltration, recycled content, and lower embodied energy. Permeable pavers, pervious concrete, and open‑joint installations reduce stormwater runoff and can help you meet local drainage rules or incentives. Permeable systems route water through joints into an engineered base and the subsoil, which requires a deeper aggregate layer and often geotextile to manage filtration and infiltration rates. While the base cost is higher, the long-term environmental benefits—reduced runoff, groundwater recharge, and potential regulatory compliance—make them attractive where drainage is a concern. In the Bay Area, permeable systems can be especially useful for handling seasonal rains while supporting sustainability targets.
Choosing an eco approach depends on your site’s infiltration capacity, willingness to keep joints clear, and whether incentives or rules affect project costs.
How to install residential pavers: step‑by‑step DIY guide
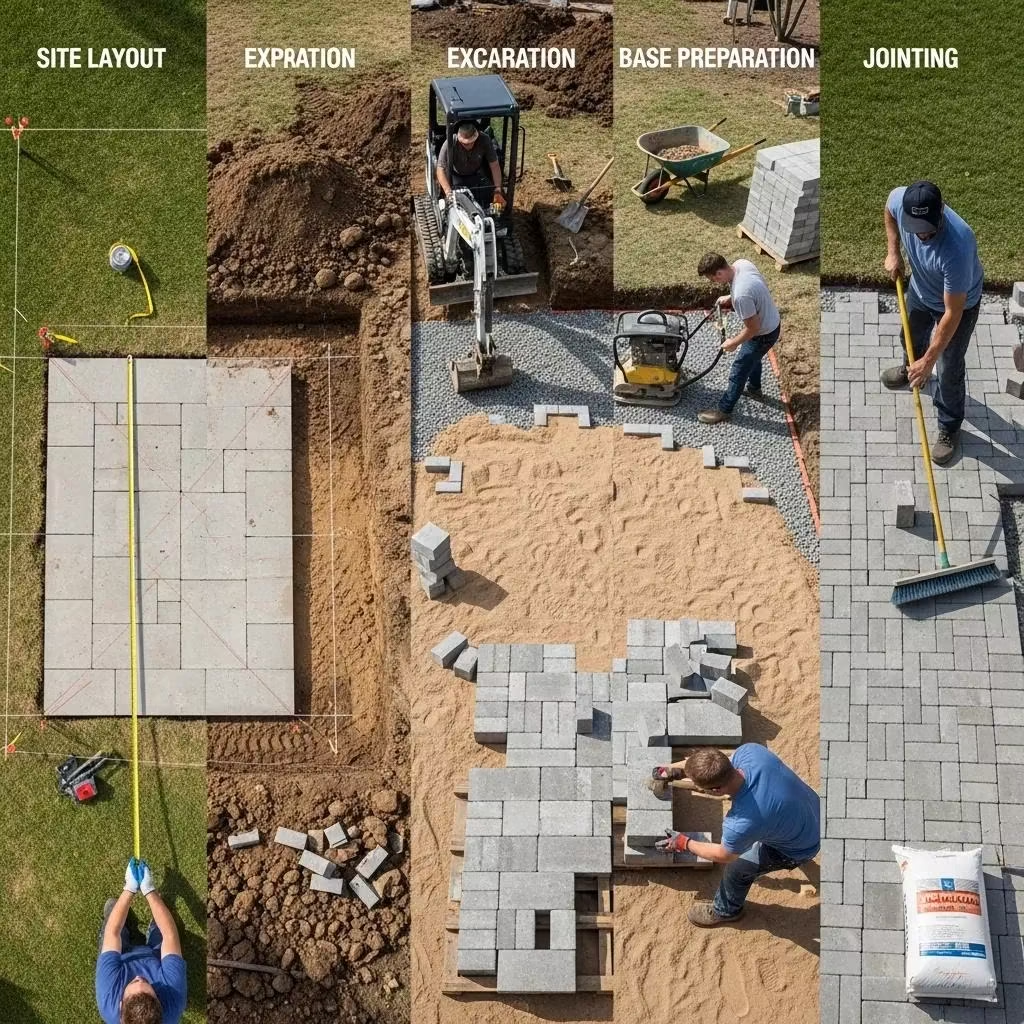
Paver installation follows a layered method: accurate excavation, an engineered base, bedding sand, precise laying, jointing, and compaction. Each step affects longevity and load performance. The performance idea is simple: a uniformly compacted base spreads loads, bedding sand allows small adjustments, and joint sand locks units together — skip any step and you risk premature failure. Below is a practical tools-and-materials checklist and a step-by-step timeline for a typical homeowner project.
Essential tools and materials for DIY paver installation:
- Plate compactor (rental), masonry saw or splitter, measuring tools, and a screed board.
- Materials: crushed stone base, bedding sand, paver units, edge restraints, polymeric joint sand, and geotextile if required.
- Optional: protective fabric, sealers, and precision cutting tools for detailed patterns.
| Installation Step | Tools Required | Time Estimate |
|---|---|---|
| Site layout & marking | Tape measure, stakes, string line | 1–3 hours (small area) |
| Excavation & subgrade prep | Shovel, skid steer (optional), wheelbarrow | 2–6 hours depending on depth |
| Base placement & compaction | Gravel, plate compactor | 2–8 hours based on area/volume |
| Bedding sand screed | Screed board, level | 1–2 hours |
| Laying pavers & cutting | Rubber mallet, saw / splitter | 4–12 hours depending on pattern |
| Jointing, compaction & sealing | Polymeric sand, compactor, broom | 2–4 hours |
What tools and materials do you need for paver installation?
A successful installation relies on a specific toolkit: a plate compactor for base compaction, a masonry saw or splitter for cuts, a long screed board and straightedge for the bedding layer, levels and string lines for layout, and a sturdy broom for joint sand. Materials include crushed stone aggregate for the base (built to the right depth), washed bedding sand for an even leveling layer, your chosen paver units, edge restraints to keep everything in place, and polymeric joint sand or fine mortar where specified. Renting heavy gear (plate compactor, saw) is usually cost-effective for a single project. In problematic subgrades, geotextile fabric helps keep fines out of the aggregate and stabilizes the base.
Having the right tools and materials speeds the job and improves the finished surface — which brings us to the installation sequence.
What are the key installation steps for a durable paver surface?
Durability starts with accurate layout and excavation to the correct depth, followed by staged aggregate placement and compaction in lifts to reach the design base depth for expected loads. After compacting the base, screed a thin bedding sand layer to a uniform thickness, then lay pavers in your chosen pattern with tight joints; cut units as needed at edges. Finish by sweeping polymeric sand into joints, doing a final compaction pass with the plate compactor (using a protective pad over the pavers), and optionally sealing to enhance color and stain resistance. These steps prevent common failures—settling, joint loss, and edge movement—and following them keeps the pavement working for years.
When a project is large, involves major grading, or calls for a permeable system, professional installation is often the better option for engineered bases, warranties, and code compliance.
Hiring pros makes sense for complex or time-sensitive jobs: they provide engineered base design, warranty-backed workmanship, and faster turnarounds than a DIY approach.
How to maintain residential pavers for longevity and curb appeal
Regular maintenance preserves both appearance and function. Sweep routinely, top up joints as needed, and seal occasionally to extend service life and prevent common problems like staining and weeds. Cleaning is simple: sweep off debris, use low-pressure washing when required (avoid joint scour), and remove oil or organic stains promptly with appropriate cleaners. Sealing is a choice that reduces stain absorption and enhances color — apply only when joints are dry and stable; most sealers last several years depending on traffic and sun exposure. Following these routines helps avoid costly replacements and keeps surfaces performing across seasons.
Regular upkeep also reveals small problems early, and the repair tips below help you fix issues before they grow.
What are best practices for cleaning and sealing pavers?
Everyday care includes sweeping and spot cleaning, occasional low-pressure washing to remove embedded dirt, and the right stain removers for oil or organic spills. Avoid high pressure that can wash out joint sand. Sealing can protect appearance and make cleanup easier; choose a sealer suited to your paver material (film-forming for richer color or penetrating for a natural look) and reapply every 2–5 years depending on wear and exposure. Keep in mind sealers can affect slip resistance, so use products rated for outdoor pedestrian areas. Good cleaning and sealing habits make ongoing care quicker and preserve the original design intent.
Those maintenance habits lead into practical repair techniques for common paver issues.
How can you repair and prevent common paver problems?
Settling, joint erosion, weed growth, and occasional cracked units are the most common issues. Typical repairs involve lifting the affected pavers, fixing or adding base aggregate, re-leveling the bedding sand, and reinstalling the pavers with fresh joint sand. Prevent problems by ensuring the base is deep enough and well compacted during installation, using proper edge restraints, and keeping joints clean with periodic brushing or polymeric sand topping. If you see extensive settlement, recurring heave, or drainage problems, engineered repairs or partial reinstallation may be required — and a professional can design a durable fix. Regular checks and small repairs prevent larger, costlier fixes later.
These repair strategies also influence design decisions that reduce long-term maintenance, which we cover next.
Popular residential paver design ideas and patterns
Pattern and design choices shape both the look and the installation effort. The right pattern balances visual goals with waste, cutting needs, and structural suitability for load areas. Some patterns distribute loads better—herringbone interlocks to give superior lateral strength for driveways, while running bond or basketweave cover patios efficiently with less cutting. Thoughtful color palettes, borders, and mixed‑material accents boost curb appeal and help define outdoor rooms. Pattern choice is a key design decision that affects installation time and cost.
Below are popular patterns and how they perform so you can pick a design that meets both style and function.
Which paver patterns enhance outdoor living spaces?
Pattern matters for both appearance and installation complexity. Herringbone gives excellent interlock and load distribution for driveways. Basketweave and running bond offer classic looks for patios and walkways with moderate effort. Staggered modular layouts suit contemporary terraces and courtyards. Scale also matters—larger units and wider joints read well in big open areas, while small-format pavers create fine texture for intimate spaces. Each pattern has different cutting needs and material waste, so plan layouts and mockups to avoid surprises during installation. Matching pattern and scale keeps the surface both attractive and fit for purpose.
Picking a pattern leads to a simple framework for choosing the right design for your home, explained next.
How do you choose the right paver design for your home?
Use a straightforward decision framework: define function (driveway vs. patio), consider your home’s architectural style, evaluate how much maintenance you want, and confirm budget and local climate impacts. Match material and pattern to those priorities for a design that performs and lasts. Ask practical questions: Will vehicles use this area? Do you want minimal upkeep? Is permeability important for stormwater? Once priorities are set, pick materials and patterns that align, and build a small mockup to test color and texture. For larger or more complex jobs, a professional design consultation can optimize layout, reduce waste, and align installation specs with local soil and grading conditions.
- Design Selection: Match paver type and pattern to use, style, and maintenance needs.
- Mockup & Sample: Try materials and patterns in a small area to confirm look and fit.
- Professional Advice: Get expert input for complex grading, driveways, or permeable systems.
Following these final steps prepares you to plan, budget, and complete a residential paver project with confidence.
Frequently Asked Questions
1. How do I choose the right type of paver for my project?
Pick a paver based on use, desired look, and performance needs. For driveways, concrete or brick are common choices for strength and durability. Patios often use natural stone or porcelain for their visual appeal. Consider slip resistance around pools and permeability if you want better stormwater management. Set a budget, weigh maintenance expectations, and consult a professional if you’re unsure—especially for driveways or permeable systems.
2. What maintenance is required for different types of pavers?
Maintenance varies by material. Concrete and brick need regular sweeping and occasional low-pressure washing. Natural stone often benefits from sealing to guard against stains and moisture. Porcelain is low-maintenance but still needs cleaning. Permeable pavers require special attention to keep joints clear so infiltration continues to work. Regular upkeep extends lifespan and keeps surfaces looking their best.
3. Can I install pavers over an existing concrete surface?
Yes—installing pavers over sound, level concrete can save time and labor. The existing slab should be crack-free and allow proper drainage. Typically a layer of sand or thin gravel is used as a bedding, but you must ensure water won’t pool. A professional can inspect the slab and advise whether an overlay is appropriate for your situation.
4. What are the environmental benefits of using permeable pavers?
Permeable pavers let rainwater soak into the ground instead of running off, which reduces flooding risk, recharges groundwater, and filters pollutants. They can reduce the need for stormwater infrastructure and help meet local stormwater regulations. For homeowners aiming for sustainable landscaping, permeable systems are a strong option—especially where runoff or tight drainage rules are a concern.
5. How can I enhance the aesthetic appeal of my paver installation?
Use contrasting colors, borders, or mixed materials to create visual interest that complements your home’s architecture. Combining different paver types—like natural stone accents with a concrete field—adds depth. Thoughtful landscaping, lighting, and mockups help you visualize the finished space and ensure a cohesive look.
6. What should I do if my pavers start to settle or shift?
Address settling quickly to avoid bigger repairs. Identify the cause—often inadequate base prep or drainage problems—then lift the affected pavers, correct or add base material, re-level the bedding sand, and reinstall. For widespread settlement, call a professional for an engineered repair. Regular inspections help catch small issues early.
7. Are there any local regulations I should be aware of when installing pavers?
Yes. Many jurisdictions have rules around stormwater management, especially for permeable systems, and zoning or HOA rules can affect material and design choices. Check with your local building department or homeowners association for permits or standards before starting. Compliance avoids fines and helps ensure a successful installation.
Conclusion
Residential pavers are a durable, attractive way to improve outdoor spaces and add curb appeal. Knowing the material options, realistic costs, and proper installation steps helps you choose the right approach—DIY for small, simple areas or professional installation for larger, load-bearing, or engineered projects. With the right planning and maintenance, pavers deliver long-lasting performance and visual impact. Ready to plan your project? Explore our resources or contact Heavenly Greens for a local estimate and design help.


